Growing Food in Riverton

This document contains local tips which I hope will be useful, especially for those just starting out growing food in our area.
Part 1 - Winter/Spring
Choosing Seed
This is a great winter activity whilst waiting for soil temperatures to rise..


Local website: www.nzseedsavers.com is an excellent resource for both learning about seed saving and obtaining seed to grow. Jasmin provides a free service to encourage seed saving, sharing and growing. All seeds are HOME GROWN and chemical SPRAY FREE and preferably grown using organic practices.
Another local source of seeds is the Environment Centre based in Riveton. You can become a member for a small fee and choose from a list of seeds.
Other places within NZ that you can order seed from include:
Heritage Food Crops - these guys offer Free Bean and tomato seeds
The more people growing and saving seeds, the better we will be able to preserve our seed lines and keep them viable for future generations. Swapping seed with neighbours and friends is a great way to preserve the very best lines.
Seed Raising


You can purchase seed raising mixes from garden centres or you could make your own using ingredients such as Coconut Coir, worm castings (from a worm farm) or sieved compost, seaweed powder (for nutrition for the growing seedlings) and purlite, vermiculite or coarse river sand (which provides soil porosity and water drainage). All ingredients mentioned are available from garden centres.
To get a head start on the season (especially if you have a short growing season like in Southland!), look into getting some grow lights and a heat pad. You can find them fairly inexpensively on Trademe and other places. Seeds can be started as early as July and will end up saving you money as well being a more sustainable way of growing your own food.
For fine seed, it can be useful to cover with some vermiculite, which helps to retain moisture. This, and covering the seed tray with a transparent lid or glad-wrap, will provide the best conditions for the seeds to germinate. Spray with water often to ensure there is available moisture but don't overdo it or you'll end up with algae or mould.
Heating the soil


Hot beds are useful in an area which has a short growing season, such as Southland. It takes some time for the sun to get the soil to a temperature that will enable seeds to germinate or seedlings to grow so if we can somehow heat the soil, we can gain an extra month or two out of the growing season. You can either make one in the autumn to extend growing into the winter or make one in the winter to gain an early spring.
How to do this is fairly simple - it's best to have a tall and skinny hotbed (as a pose to a wide shallow one) because it helps retain the heat produced. If you are making one in autumn, make the bed larger - about 6 foot square, or 1.8m square with a height of 60 - 90 cm, but if you are making towards the end of winter, you can go smaller. You can use recycled bricks or an old pallet to surround the bed and keep it contained, insulating with cardboard if you like. Fill your hotbed with nitrogen rich material - fresh horse manure or chicken manure are great for this. As you add the manure, tamp it down so it is nice and compressed. If your hotbed is outside and not in a tunnel house, place a cold frame over the top (so there is a lid over it to help prevent the heat from escaping), add 6 inches of potting mix to the top of the bed and wait until it warms up.
Seeds that you can sow in the hotbed include: beets, carrots, lettuce and other salad leaves, onions, spinach, chard, radishes and turnips. You will be able to start harvesting a couple of months ahead of others in your area with this method.
Alternatively you can cover a garden bed with translucent or black plastic to heat the soil up ahead of sowing seeds or planting out seedlings. As well as heating up the soil, it also allows very wet soil to dry out a bit which can be desirable if you've had a wet, cold winter.
Compost

Compost is a valuable accessory for any garden if you want to grow strong, nutritious vegetables and I usually have multiple compost heaps on the go at any time of the year. I tend to have them in among my gardens because when I'm weeding, I like to be able to chuck the weeds on the closest one, without having to walk more than a few paces. When I get hold of a load of manure, seaweed, or pea straw, I treat each compost heap to some of the bounty. Mine are slow processing heaps as I don't turn them and I also add to them over time. So they don't get hot but they do provide useful mulch when I need it in the warmer parts of the year and at the end of the season or the start of the next, I can add the developed compost to the beds. I try to ensure there are no weed seeds in my heaps to avoid spreading them throughout my garden.
You can alternatively build a hot compost heat where you gather all the materials at once, and put them together such that the carbon:nitrogen ratio is ideally around 20 - 30:1. While there is an exact science to building compost, it seems you will still be successful if you aim for approximately 50% Green material and 50% Brown material.
GREENS: Coffee Grounds, Vegetable Waste, Chicken Manure, Cow Manure, Horse Manure, Sheep Manure, Pig Manure, Food Waste, Grass clipping
BROWNS: Straw, Bark (hardwood), Bark (softwood), Corrugated cardboard, Sawdust, Wood chips (hardwood), Leaves, Seaweed
Mix, wet lightly and turn regularly and you will get some heat generated and have compost within a month or so.
For those living in Riverton and surrounds: an excellent source of worm filled compost is available from a farm close to Otautau. This farm is spray free and uses natural products (such as seaweed and fish emulsion ) to boost the health of their animals and land. The compost starts as native wood chip, which is soaked in their dairy cow effluent for a short time. It is then left to sit for a time (where it begins the process of composting) before being placed in the over-wintering cow barn. The cows use it as their bedding for the winter, trampling on it, laying on it, birthing on it, and of course pooing and peeing on it. The result is an anaerobically (without air) produced compost which is then placed outside in mounds after the winter.. the worms then find it and take up residence resulting in a compost that is highly fertile (seeds germinate very readily in it). Please contact me (Tamsin, 02041409990) if you are interested in getting either a trailer load (from Riverton) or a full truck load (10m3) direct from the farm.
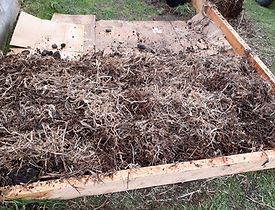
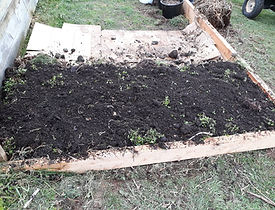
Compost
This picture shows a slow-brewing compost heap alongside gardens - it gets added to intermittently.

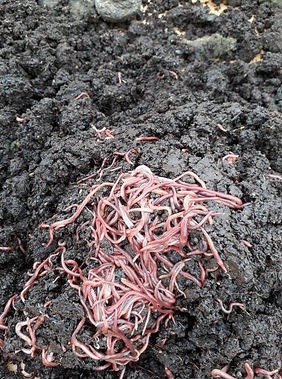
The picture above shows the worms from a bucket of locally sourced compost which had been sitting overnight. I should have given that one to the chickens!
Compost is a valuable accessory for any garden if you want to grow strong, nutritious vegetables and I usually have multiple compost heaps on the go at any time of the year. I tend to have them in among my gardens because when I'm weeding, I like to be able to chuck the weeds on the closest one, without having to walk more than a few paces. When I get hold of a load of manure, seaweed, or pea straw, I treat each compost heap to some of the bounty. Mine are slow processing heaps as I don't turn them and I also add to them over time. So they don't get hot but they do provide useful mulch when I need it in the warmer parts of the year and at the end of the season, or the start of the next, I can add the developed compost to the beds. I try to ensure there are no weed seeds in my heaps to avoid spreading them throughout my garden.
You can alternatively build a hot compost heat where you gather all the materials at once, and put them together such that the carbon:nitrogen ratio is ideally around 20 - 30:1. While there is an exact science to building compost, it seems you will still be successful if you aim for approximately 50% Green material and 50% Brown material.
GREENS: Coffee Grounds, Vegetable Waste, Chicken Manure, Cow Manure, Horse Manure, Sheep Manure, Pig Manure, Food Waste, Grass clipping
BROWNS: Straw, Bark (hardwood), Bark (softwood), Corrugated cardboard, Sawdust, Wood chips (hardwood), Leaves, Seaweed
Mix, wet lightly and turn regularly and you will get some heat generated and have compost within a month or so.
For those living in Riverton and surrounds: an excellent source of worm filled compost is available from a farm close to Otautau. This farm is spray free and uses natural products (such as seaweed and fish emulsion ) to boost the health of their animals and land. The compost starts as native wood chip, which is soaked in their dairy cow effluent for a short time. It is then left to sit for a time (where it begins the process of composting with abundance of mycelial growth) before being placed in the over-wintering cow barn. The cows use it as their bedding for the winter, trampling on it, laying on it, birthing on it, and of course pooing and peeing on it. The result is an anaerobically (without air) produced compost which is then placed outside in mounds after the winter.. the worms then find it and take up residence resulting in a compost that is highly fertile (seeds germinate very readily in it). Please contact me (Tamsin, 02041409990) if you are interested in getting either a trailer load (from Riverton) or a full truck load (10m3) direct from the farm.
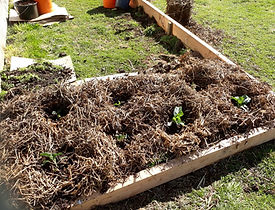
No-Dig Lasagna Beds

1. First lay down the card board with no gaps, then thoroughly wet it.
These are my favourite style of bed to build because you can build them directly onto grass, they are quick and easy to make and when you are finished, you can start planting immediately, happy in the knowledge that everything you plant in this bed will flourish and the weeds won't get a look in.
First, select an area of lawn you want to make a bed on.. it could even be an existing garden bed that has got out of control with weeds. Then lay down either cardboard (with tape and stickers removed) or newspaper (thickly) so that there are no gaps. Thoroughly wet the cardboard/newspaper with a hose or watering can and then add a thick layer of manure (horse, sheep, chicken etc.) along with straw (use compost if you have no manure). On top of this, lay a thick layer of weeds/greens (i.e. cut grass) - you can add seaweed to this layer if you have it available. Coffee grounds are good here too. Then add a layer of soil before adding another layer of manure and straw. You can then open the manure/straw layer and plant directly into the soil (so make sure it's a thick enough layer to support the root system of a growing plant). You plants will benefit from the warmth generated from the manure composting under and around them but they won't be burnt by it as it will have composted by the time the roots reach that layer.

2. Add manure (and top up with compost if you don't have enough manure).

5. Add seaweed if you have access to any.

8. Add straw for the top layer.
3. Add straw.
6. Add a thick layer of soil.

4. Add green matter - weeds, grass clippings etc.

7. Add more manure/compost.
9. Open up the straw and plant into the soil layer.
Companion Planting

There are many great companions that you can plant together in your garden (as well as some that should be avoided) - they are easy enough to look up but I just wanted to share a tip I was given last growing season. When you plant corn (yes, I know, a bit hit and miss around here, although we had perfect growing conditions last season!) - if you sow a yam seed in between each 4 corn seedlings you will end up with a bumper crop of both. I believe the corn also keeps any wire worm away from the yams as they prefer the sweet corn root sap rather than the sour yams.
Please let me know of any other great combos that have worked for you!
Fruit Trees and Berries
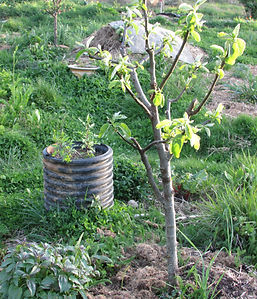

Fruit Trees and Berries are great to incorporate into your garden as soon as possible as they take some time to start fruiting but once they do, you end up with a yearly harvest of delicious, nutritious bounty, for minimal effort.
Take some time to figure out where the tree/berry would thrive in your garden. They tend to require a good amount of sun. Be aware that stone fruit needs to be in a sheltered sunny spot if you want it to survive the Southland weather but apple and pear trees are hardy and handle the wind a lot better.
When planting your fruit tree, ensure that the hole is deep and wide and that you mix in a bit of compost to the soil that you pack around the roots to give the tree a good start in its new position. It is best to stake it as you plant if it is in a windy spot. Prune it to the shape you would like (there are many good videos on the internet or better still, ask someone with experience to show you how) and then continue to prune every year in the winter when the leaves are dropped and the tree is dormant. It's a good idea to put some compost around the base (but not touching the trunk) every year in the spring to give the tree a boost as it begins the yearly cycle of growth.
For berries, consider where you might be able to grow a number of them together and then be able to protect them from the birds when they are ripe (otherwise, you might not get a look in - birds are amazing at finding ripe fruit and will descend en masse when the time is right!)
Be aware that raspberries grow quite tall and put out suckers which spread around your garden so you need to consider where you might be able to keep them contained. It is best to stake up raspberry canes (or have them growing alongside a trellis) to enable easy harvesting. Fertilize and mulch for best harvest!